Complete Manual SOL-7000
Printable version
Device version: SOL-7000
Reference firmware: SOL-7000 V1.9 B136 260920 SWD
Manual updated: 20/09/2026
Manual SOL-7000
SOL-7000 is a professional photoperiod programmer for the management of dimmable lamps, neon and seasonal light profiles.
The manual describes the use of the product from the point of view of the installer and the end user.
- Mains frequency
Index
Use and installation
- Introduction
- Security
- Panel and controls
- Electrical connections
- Installation
- First ignition
Programming
- Programs
- Personal Table
- Personal Table 2
- AstroGPS
- Lamp limit
- Lamp profiles
- Dimmer and neon
- Night light
- Night inspection
- Energy saving
Support
- Time and date
- Troubleshooting
- Technical specifications
- Compliance and guarantee
- Downloads
Important note
For wiring, always use the diagram supplied with the actual version of the product.
Reference version
Reference firmware:
SOL-7000 V1.9 B136 260920 SWD
Manual updated:20/09/2026
Introduction
SOL-7000 is a dawn-dusk control unit Season Generator to automatically manage the photoperiod in rooms dedicated to ornithology, breeding and care of live decoys.
The device gradually adjusts the turning on, off and intensity of the light, simulating the natural progression of the day. In this way it avoids abrupt transitions between darkness and full light, helps maintain a more regular environment for the birds and allows the different seasonal phases to be accompanied with progressive transitions.
In the breeding of canaries and other ornamental species, correct management of the hours of light can support the phases of rest, moulting, preparation for reproduction and singing, always respecting the biological needs of the animals.
For those who breed live decoys, SOL-7000 allows you to gradually shift the light-dark cycle into a closed room, so as to prepare the animals for the hunting period with a controlled and natural photoperiod, avoiding complete darkness, sudden switching on and too rapid changes. Use must always take place in compliance with current regulations and correct animal husbandry and welfare practices.
Main functions
SOL-7000 allows you to manage:
- gradual sunrise and sunset;
- annual or personalized light programs;
- calibrated lamp profiles;
- dimmable output;
- lamp-neon passage when required by the configuration;
- night inspection;
- temperature and current protections.
Typical applications
SOL-7000 is designed for those who need to manage light in a progressive and repeatable way:
- breeding of canaries and other ornamental species;
- rooms for live recalls;
- preparation for moulting;
- preparation for singing;
- maintenance of regular light-dark cycles;
- controlled simulation of the seasons.
Before we begin
Before installation, prepare the room and define the type of system to be created.
- choose a suitable room, in which the control unit is protected from rain, humidity, condensation, dust and other external agents;
- prepare the room with the lamps required by the system, dimmable and possibly neon;
- choose the exact model of dimmable lamps, to use the most suitable profile;
- decide on the type of output required: dimmable lamp only, dimmable lamps + neon, or dimmable lamps kept lit together with the neon;
- always connect compatible dimmable lamps to the lamp outputs when you want to use the dawn-dusk adjustment;
- load voltage and power;
- position of the control unit;
- desired light program: preset program, personal program 1, personal program 2 or AstroGPS with GPS coordinates;
- seasonal period to simulate or translate.
With LED lamps, the model is an important factor: not all are built the same way and the response to dimming varies from brand to brand, and often even between different models of the same brand. For this reason Season Generator develops profiles dedicated to compatible lamps: the correct profile allows for more regular regulation than a simple generic percentage.
Security
Read this chapter before installing or using SOL-7000.
SOL-7000 can work with loads and circuits that require electrical expertise. The installation must be carried out by qualified personnel and with the power supply disconnected.
General warnings
- Do not open the device.
- Do not modify the internal circuit.
- Do not exceed the electrical limits of the product.
- Do not connect incompatible loads.
- Do not intervene on the terminals with the power supply switched on.
- Do not use the product in wet environments, with condensation or conductive dust.
- Do not use unauthorized software or modifications.
Water, splashes and baths
SOL-7000, sockets, cables, lamps and connections are not protected against water jets, splashes or immersion, unless a different IP rating is expressly indicated on the plate of the individual product.
On farms, position drinking troughs and bath tubs so that water and splashes cannot reach the control unit, sockets, connections or light sources. Do not install lamps, plugs or control units under bathroom outlets or in areas where water can drip onto the connections.
If a component or cable gets wet:
- immediately remove the upstream power supply;
- do not touch plugs, connectors or electrical parts while they are wet;
- do not reactivate the system until it has been dried, checked and deemed suitable by qualified personnel.
Water and condensation can cause short circuits, corrosion, overheating and electrical hazards.
Power supply and electrical network
Before any connection:
- Disconnect the power;
- check for absence of voltage;
- check the product diagram;
- check the tightening and section of the cables;
- check protections upstream of the system.
Always use the connection diagram provided with the actual version of the product. Do not use images or diagrams of different versions without confirmation.
Dimmable lamps
Use only lamps compatible with the intended mode.
An incompatible lamp can cause:
- flickering;
- irregular ignitions;
- sudden shutdowns;
- electrical noise;
- overheating;
- intervention of the protections.
When available, prefer lamp profiles already measured and approved.
Device protections
SOL-7000 may stop operation in case of abnormal conditions, for example high temperature or incorrect load. These protections help avoid damage, but do not replace the electrical protections of the system.
In case of blocking or abnormal behavior:
- do not force repeated restarts;
- disconnect the load if a fault is suspected;
- check wiring, lamp and dissipation;
- contact assistance if the problem repeats.
Panel and controls
This page describes the logic of use of the front controls.
Display
The display shows:
- program status;
- configuration menu;
- editable values;
- any warning messages;
- references to language, time, date and light parameters.
The default startup message is:
SEASON GENERATOR
Keys
Typical key logic is:
| button Function | |
|---|---|
MENU | enters the menu or scrolls through the items |
OK | confirm and save the value |
| up arrow | increase value or selection |
| down arrow | decrease value or selection |
| left/right arrow | change field or room when expected |
INSP. | manages the night inspection |
Exact wordings may vary depending on panel graphics.
Navigation
Rule of thumb:
- press
MENUto enter configuration; - use arrows or
MENUto reach the item; - use arrows to modify;
- confirm with
OK; - wait to return to the main screen or exit the menu.
Language
The menu may be available in multiple languages, depending on the product version.
When an item on the display is abbreviated, the operational meaning is indicated in the manual instead of just the abbreviation.
Output status
SOL-7000 can control lamp, neon and dimming according to the product configuration.
If the device detects an abnormal condition, it can temporarily turn off the outputs and display a warning message.
In this case, check the lamp, connections and environmental conditions before restarting.
Electrical connections
This page brings together the main information to recognize inputs, outputs and connections of the SOL-7000 control unit.
The aim is to avoid misunderstandings during installation: the input socket powers the control unit, the upper output is dedicated to the dimmable lamp, the lower output is dedicated to the ON/OFF load, and the side jacks are very low voltage signal inputs.

Electrical connection diagram of the SOL-7000 control unit
Legenda: fase 230 V~, neutro, segnali a bassissima tensione e alimentazione interna elettronica sono indicati nello schema con colori e linee differenti.
General view of the product
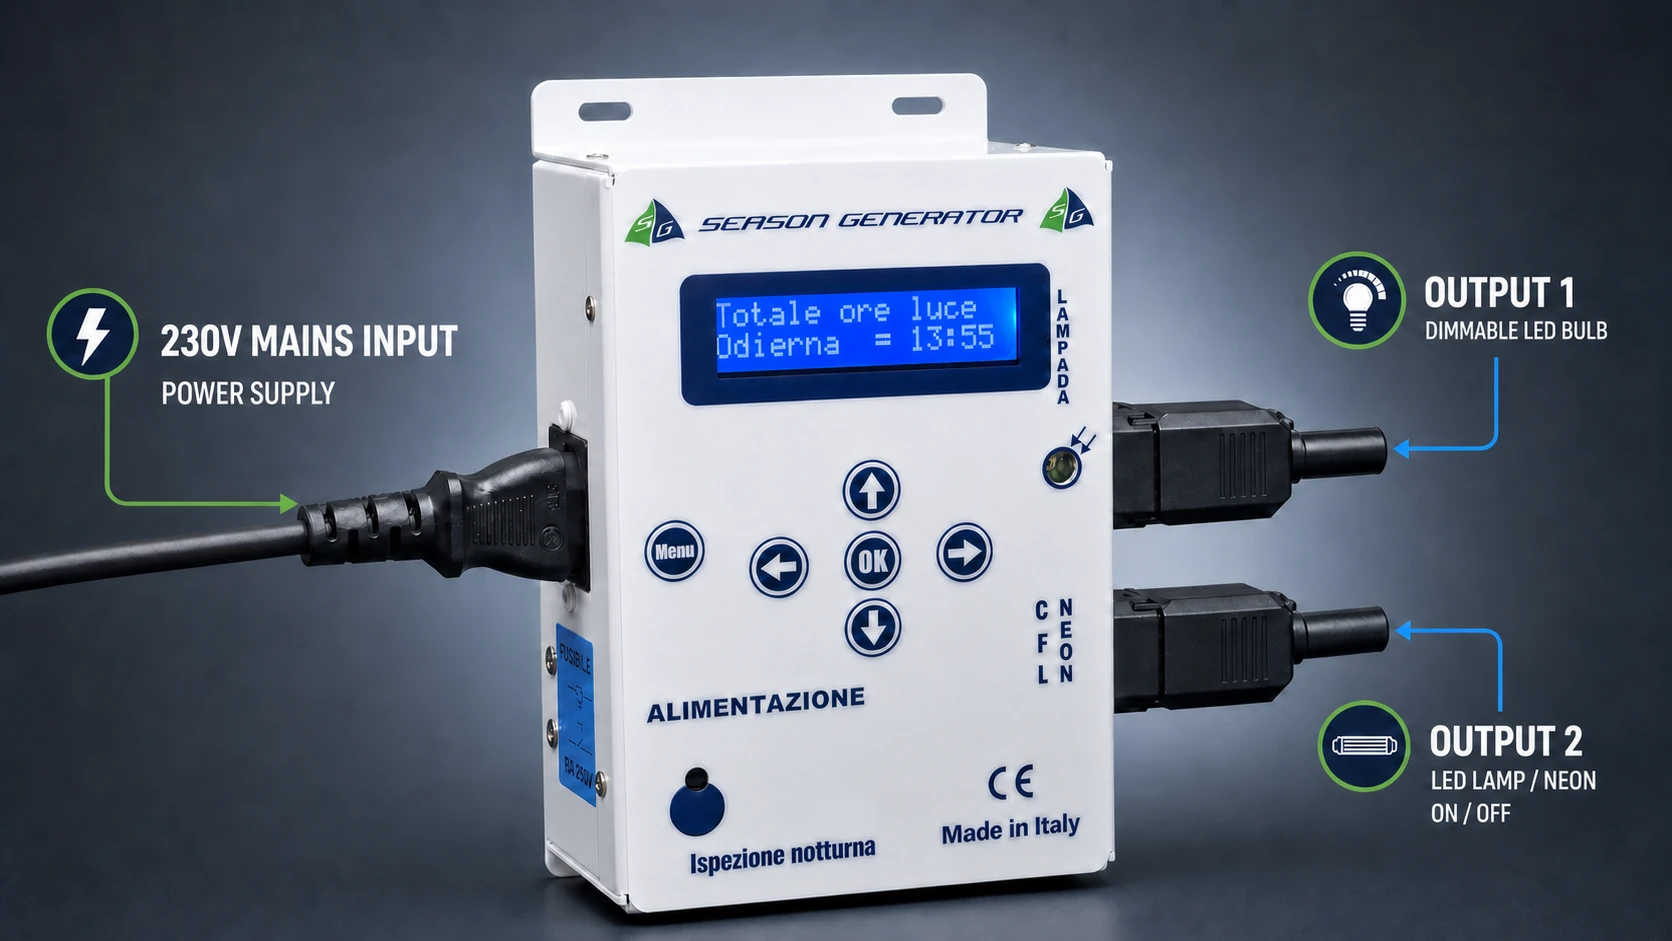
The product view shows the practical arrangement of connections:
- the mains power supply
230 V~enters on the left side; - the upper output controls the dimmable lamp;
- the lower output controls the neon or a load ON/OFF;
- the night inspection button is located on the front;
- the side jacks are used for very low voltage accessories, such as external photocell and remote inspection control, if provided for by the installed version.
How the circuit is made
Power comes in from the IEC C14 socket. Phase and neutral power the internal electronics and the output stages. The phase is protected by the fuse integrated in the power socket.
The two IEC C13 outputs do not have the same function:
| Link | Location | Function | Expected load |
|---|---|---|---|
| IEC C14 mains input | power supply side | powers the control unit | suitable network cable |
| IEC C13 upper output | output side, top | dimmed TRIAC output | compatible dimmable lamp |
| IEC C13 bottom output | output side, bottom | ON/OFF output | neon, power supply or compatible non-dimmed load |
| 3.5mm jack | power supply side | signal inputs | external photocell or remote button, if provided |
Upper dimmed output
The upper output is the one to be used for the lamp that creates dawn and dusk. The control unit regulates the power gradually following the program, sunrise duration, sunset duration and selected lamp profile.
Connect only lamps declared dimmable and compatible with the chosen mode to this output. An unsuitable lamp may flicker, not turn off properly or be damaged.
Lower ON/OFF output
The bottom output works as on and off. It is designed for neon or for loads that do not need to be dimmed.
This output is used in modes that involve switching between lamp and neon or the simultaneous switching on of lamp and neon during full light.
Very low voltage jack inputs
The 3.5mm jacks are not power outputs. They are only used for control or measurement accessories, depending on the product version.
Mains voltage must never be applied to the 3.5 mm jacks. Only connect accessories foreseen by Season Generator or clean contacts indicated by the product documentation.
Built-in fuse
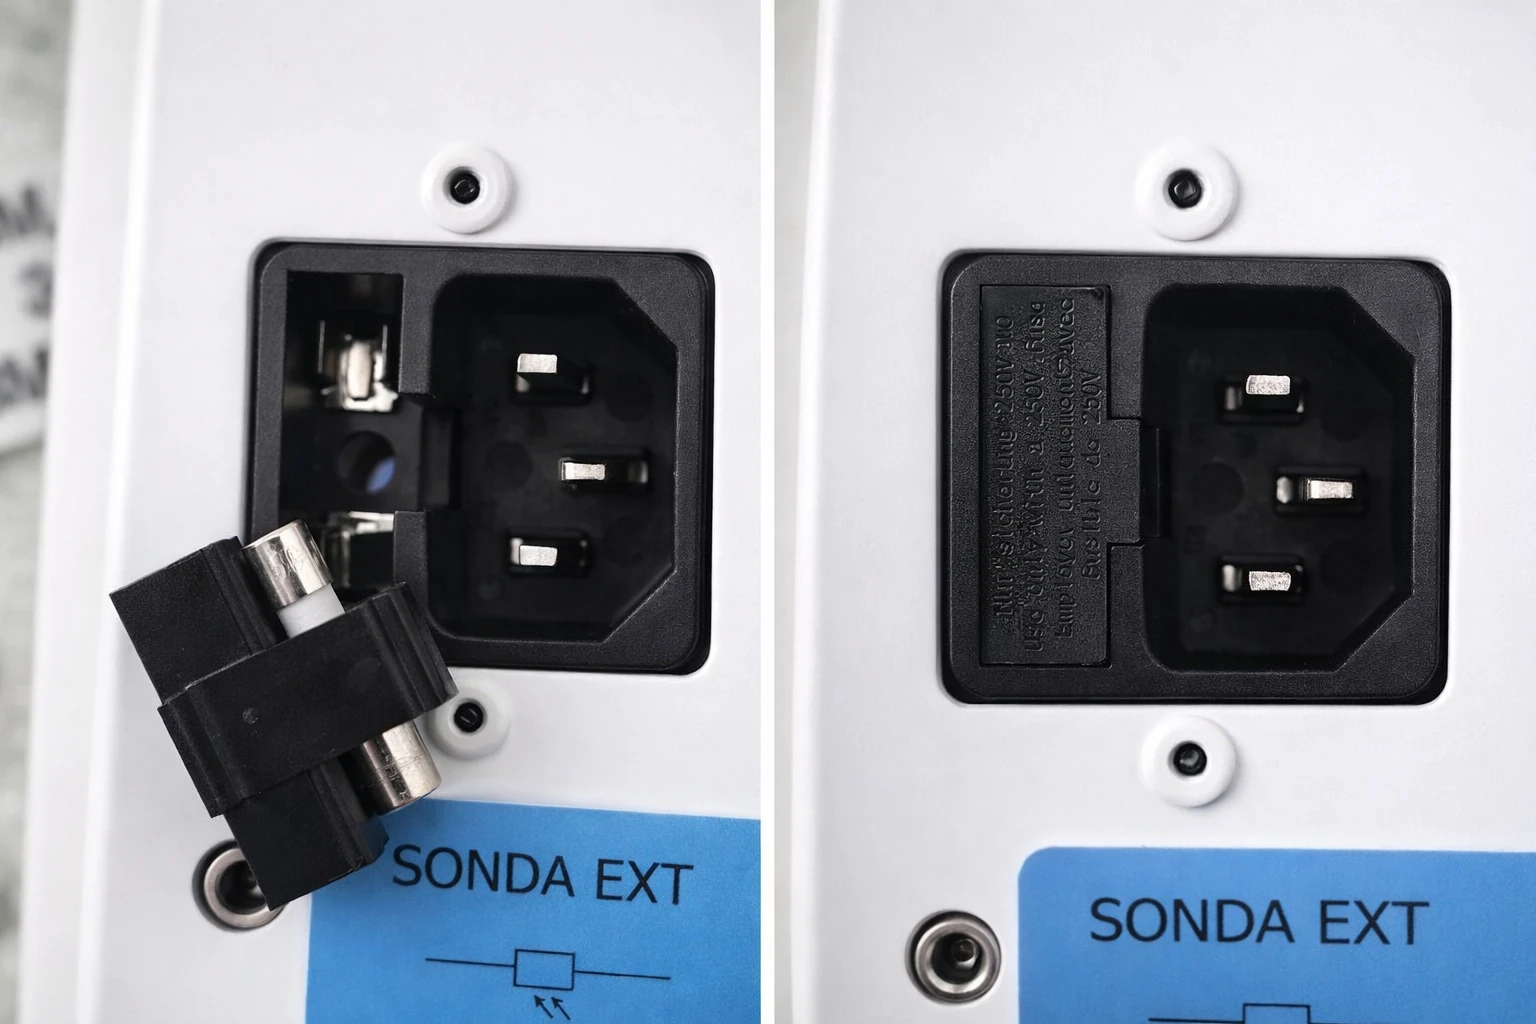
The fuse is located in the drawer integrated into the IEC C14 power socket.
To replace it:
- completely disconnect the power cord;
- extract the fuse holder drawer;
- replace the fuse only with one of the same type and value indicated for the control unit;
- close the drawer before reconnecting the power.
Never bridge the fuse and do not use values other than those foreseen.
Output plugs towards the light sources
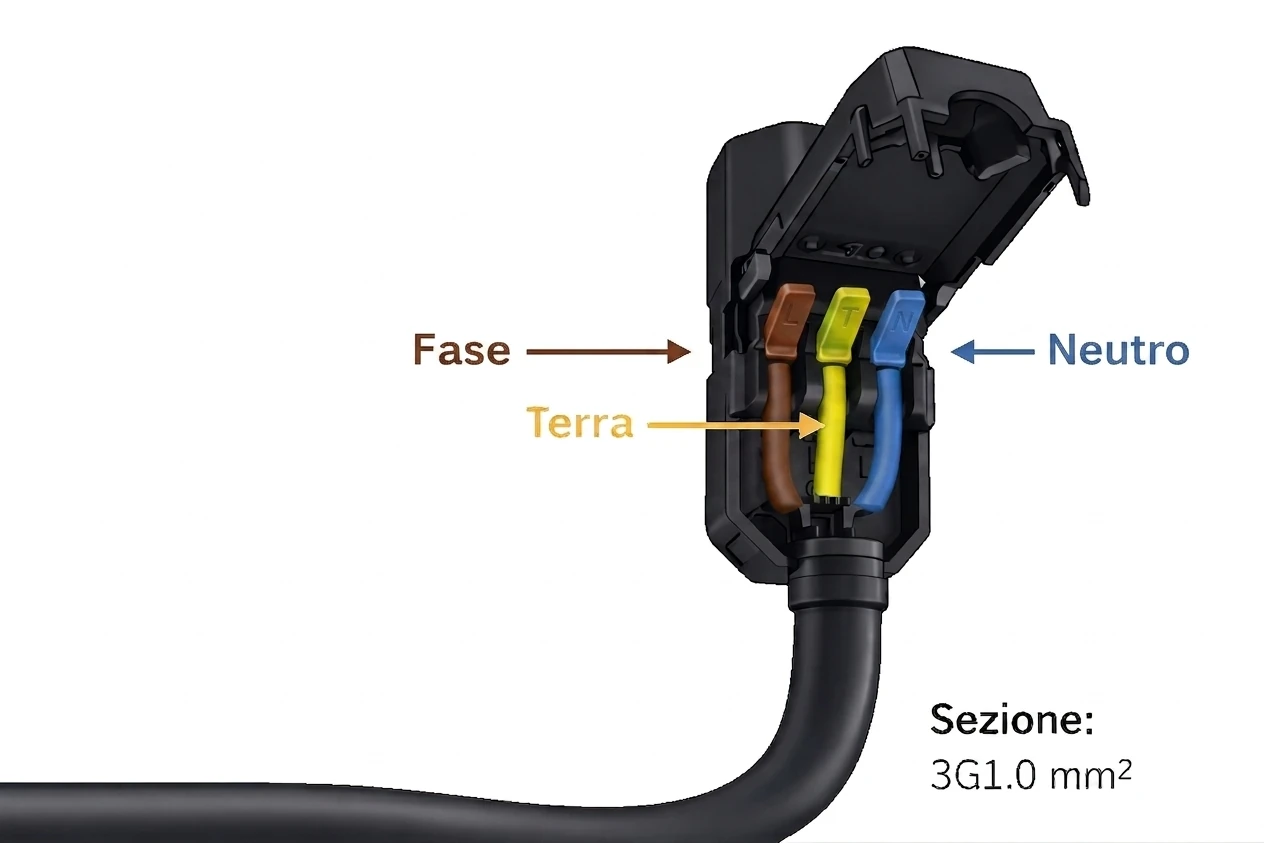
The figure shows the wiring of the removable IEC plugs to be used on the control unit outputs, i.e. towards the light sources connected to SOL-7000.
The principle is the same for both outputs:
| Clamp | Conductor | Function |
|---|---|---|
L | brown | phase controlled by the control unit output |
N | blue | neutral towards the light source |
T / earth | yellow-green | earth protection, if provided by the lamp or lighting body |
On the upper output the plug powers the dimmable lamp used for dawn and dusk. On the lower output the plug powers the neon or the ON/OFF load.
Tighten the terminals and cable gland correctly. The connection of the outputs must be carried out by qualified personnel and always with the control unit disconnected from the mains.
Checks before switching on
Before powering the SOL-7000 check:
- power cable and earth;
- fuse inserted and correct;
- dimmable lamp connected to the upper output;
- neon or ON/OFF load connected to the lower output, if provided;
- jacks connected only to very low voltage accessories;
Lamp+Neon,Only lamporLamp(ON)+Neonmode consistent with the system created.
Installation
Install SOL-7000 only after reading the safety chapter.
The connections must be made using the wiring diagram supplied with the specific version of the product. The Electrical Connections page summarizes mains input, IEC outputs, accessory jacks and fuse.
Positioning
Install the device:
- in a dry environment;
- away from heat sources;
- in an accessible position for maintenance;
- with sufficient ventilation;
- protected from impacts and conductive dust.
Avoid:
- direct exposure to water;
- condensation;
- passage of power cables not separated from the signals;
- temporary installations not fixed.
Before wiring
Check:
- exact product model;
- product version;
- connection diagram;
- Power available;
- lamp type and power;
- presence of neon if provided;
- earthing and system protections;
- compatibility with local regulations.
Product version
Before wiring, always check that the diagram, terminals and accessories correspond to the version actually supplied.
Do not use older schematics or unapproved photographs to decide connections.
Lamp and neon
If your system uses a Dimmable + Neon configuration, check:
- compatible lamp;
- presence of the correct lamp profile;
- correct transition to neon at the end of the curve;
- absence of flickering;
- correct shutdown at the end of the cycle.
Initial testing
After wiring:
- visually check all connections;
- power without load if the test procedure requires it;
- check that the display is on;
- set date and time;
- select program and lamp profile;
- try a short ramp;
- check that the lamp and neon work as expected;
- Save or note the final configuration.
First ignition
When you turn it on for the first time, check that the device responds to the keys and that the display shows the initial screen correctly.
Immediate controls
Check:
- turning on the display;
- absence of odors or abnormal noises;
- absence of overheating;
- key response;
- correct saving of values;
- time and date;
- tongue;
- selected program;
- lamp profile.
Recommended sequence
- Turn on SOL-7000.
- Check the initial message.
- Set language.
- Set the date and time.
- Check the expected hardware configuration.
- Select lamp profile.
- Select the light program.
- Set sunrise and sunset duration.
- Decide on the output mode: lamp only, lamps + neon, or lamps kept lit together with the neon.
- Set any night light.
- Try night inspection.
After testing
Note:
- lamp profile;
- selected program;
- output configuration;
- sunrise/sunset settings;
- any brightness limits;
- any notes on the behavior of the lamp.
Retain this information for service or future adjustments.
Programs
SOL-7000 manages photoperiod via the Use Program menu.
A schedule decides the times of sunrise and sunset and how the light changes throughout the days. After choosing the program, the control unit works automatically following the internal clock.
Menu path
Route:
MENU -> Use the program
Screens displayed:
Use the programPrg:
With UP and DOWN you scroll through the programs. With ENTER you confirm the one displayed.
With MENU, from the Use the program screen, you move to the next function.
Programs available
The following items are available in the SOL-7000 menu:
The names of the preloaded tables should not be interpreted as an exclusive restriction to the indicated species. They are practical names assigned to different light profiles: each table has its own seasonal trend, with minimum and maximum length of the day, growth and reduction of hours, sunrise and sunset times and ramp progression. For this reason, a table called, for example, Song thrush, Redwing, Fieldfare, Canaries or Crest Agi can also be used in different situations, when the light profile better corresponds to the objective of the breeder or user.
| Display Name | Usage |
|---|---|
Custom2 | personalized program from start date to end date |
Personal | personalized program with daily variation + / - minutes |
Standard | general light profile, useful when there are multiple needs or multiple species in the same room |
Song thrush | preloaded light profile identified with this name |
Redwing | preloaded light profile identified with this name |
Skylark | preloaded light profile identified with this name |
Fieldfare | preloaded light profile identified with this name |
Breeding | preloaded livestock-oriented light profile, if enabled in the installed version |
Finches | preloaded light profile identified with this name |
Canaries | preloaded light profile identified with this name |
Crest Agi | preloaded light profile identified with this name |
AstroGPS | astronomical program from coordinates |
Manual | program with fixed times set by the user |
Some tables may not appear if they are not enabled in the control unit version.
Manual Program
Manual always uses the same times, without changing from day to day.
When you confirm Manual, the display asks:
Sunrise beginSunset beginSunrise durationSunset duration
Use Manual when you want the same cycle every day, for example sunrise always at the same time and sunset always at the same time.
Preloaded tables
The preloaded tables already contain a seasonal progression: for each day of the year the device obtains sunrise time, sunset time and total duration of light.
On the Season Generator website it is possible to see the behavior of the main tables and the times they represent day by day:
- Standard Table
- Bottaccio Table
- Sassello Table
- Lark Table
- Finches Table
- Canaries Table
- Agi and Crest Table
To advance or postpone the times in the table compared to those displayed, simply move the programmer date forwards or backwards. In this way the table also moves automatically and the user can adapt the period of greatest light to their needs.
After choosing a table, the control unit asks:
Sunrise durationSunset duration
These values indicate how many minutes the light should go up or down.
Personal Program
Personal allows you to start from an initial time and change it by a few minutes every day.
When you confirm Personal, the display asks:
Reset day/Count :Sunrise beginSunset begin+/-min Sunrise+/-min SunsetHow many days?Sunrise durationSunset duration
The operation is described in the Personal Table chapter.
Personal Program2
Custom2 allows you to set a starting point and an ending point.
The control unit automatically calculates the intermediate steps between:
- initial date and times;
- final date and times.
The operation is described in the chapter Personal Table 2.
Program AstroGPS
AstroGPS calculates the light cycle using geographic coordinates.
It is used when you want to simulate the natural trend of the sun in a place, maintaining control of the photoperiod inside a closed room.
Operation is described in chapter AstroGPS.
After choosing the programAfter changing programs, always check:
- time and date of the control unit;
- dawn duration;
- sunset duration;
- lamp limit;
- lamp/neon mode;
- night light;
- energy saving.
Personal Table
In the menu, Personal is the program that allows you to create a progression day by day.
You set an initial sunrise and sunset time, then decide how many minutes these times should change each day.
Menu path
Route:
MENU -> Use the program -> Prg: Personal -> ENTER
Screens displayed:
Reset day/Count :Sunrise beginSunset begin+/-min Sunrise+/-min SunsetHow many days?Sunrise durationSunset duration
Reset counter
The Reset day screen allows you to restart the program from the first day.
Values:
YESNO
Choose YES when you want to start a new progression. Choose NO when you want to keep the counting already in progress.
Start of sunrise time
Set the sunrise time of the first day.
Format:
HH:MM
Commands:
LEFTincreases hours;UPincrease minutes;ENTERconfirms.
Tram start time
Set the sunset time on the first day.
Format:
HH:MM
Commands:
LEFTincreases hours;UPincreases minutes;ENTERconfirms.
+ / - Sunrise
Set how many minutes the sunrise changes every day.
- positive value: dawn is brought forward;
- negative value: sunrise is postponed;
- value
0: sunrise remains the same.
+ / - Sunset
Set how many minutes the sunset changes every day.
- positive value: sunset is postponed;
- negative value: sunset is brought forward;
- value
0: the sunset remains the same.
Duration days?
Set how many days to apply the change.
When the duration is over, the program keeps the last times reached.
Sunrise and sunset duration
Sunrise duration and Sunset duration indicate how many minutes the rise and fall of the light should last.
Use gradual times to avoid sudden transitions between darkness and full light.
When to use Personal
Use Personal whenever you want:
- progressively increase or reduce daylight hours;
- move a season in a controlled manner;
- prepare a singing, moulting or playing phase;
- create a simple progression starting from known times.
Personal Table 2
In the menu, Custom2 allows you to set an initial photoperiod and a final photoperiod.
SOL-7000 automatically calculates intermediate times based on the date.
Menu path
Route:
MENU -> Use the program -> Prg: Personale2 -> ENTER
Screens displayed:
Start date phoSunrise todaySunset todayEnd date photoSunrise endSunset endSunrise durationSunset duration
Photo start date
The initial date is taken from the current date of the control unit.
Before programming Custom2, check that the time and date are correct in the Modify / Time and Date menu.
When you press ENTER, SOL-7000 stores the current date as the start of the photoperiod.
Sunrise time today
Set the sunrise time of the initial day.
Commands:
LEFTincreases hours;UPincrease minutes;ENTERconfirms.
Sunset time. today
Set the sunset time of the starting day.
Commands:
LEFTincreases hours;UPincrease minutes;ENTERconfirms.
Photo end date
Set the arrival date of the photoperiod.
Commands:
DOWNincreases day;RIGHTincreases the month;MENUincreases the year;ENTERconfirms.
If the end date is invalid, the display shows Date error and asks you to press ENTER.
Fine sunrise time
Set the sunrise time to reach the final date.
End of tram time
Set the sunset time to reach the final date.
Sunrise and sunset duration
After the start and end times, the display asks:
Sunrise durationSunset duration
These values regulate the gradualness of the daily transitions.
When to use Personale2
Use Custom2 when you know:
- the day of departure;
- the day of arrival;
- the initial photoperiod;
- the final photoperiod.
It is the most convenient program when you want to arrive at a precise date with precise times, without manually calculating the daily variation.
Reopening Personale2
When Personale2 is opened again, the controller retains and proposes the saved end date when it is still valid and in the future. If the stored date is no longer valid or has passed, SOL-7000 proposes the next valid date after the current day. Confirm or change the date before saving the program again.
AstroGPS
AstroGPS calculates sunrise and sunset using geographic coordinates.
This function is used to naturally simulate the photoperiod of a place, even when the control unit is installed in a closed room.
Menu path
Route:
MENU -> Usa il programma -> Prg: AstroGPS -> ENTER
Screens displayed:
Control location/Lat:Control location/Long:Control location/UTC:Simul. location/Lat:Simul. location/Long:Twilight:
Control unit location
Control location indicates where the device actually is.
The menu asks:
Lat:Long:UTC:
This data allows the control unit to correctly place the day in the actual place of installation.
Latitude and longitude
Coordinates are expressed in degrees with two decimals.
Commands:
LEFTandRIGHTmove the cursor;UPincreases the selected value;DOWNdecreases the selected value;- on the sign,
UPorDOWNchange North/South or East/West; ENTERconfirms.
On the display, West longitude can be indicated with the letter O.
UTC
UTC: sets the real location's time difference from UTC.
Commands:
LEFTincreases by 1 hour;RIGHTdecreases by 1 hour;UPincreases by 15 minutes;DOWNdecreases by 15 minutes;ENTERconfirms.
Simulated location
Simul. location is the place whose photoperiod you want to reproduce.
The menu asks:
Lat:Long:
Example: the control unit can be installed in Emilia, but simulate a place with a different season to gradually shift the light-dark cycle.
Twilight
The Twilight: screen allows you to enable or disable twilight management.
Values:
EnabledDisabled
With dusk enabled, light begins and ends more gradually around sunrise and sunset events.
With dusk disabled, SOL-7000 uses sunrise and sunset as primary references.
Recommended checks
After configuring AstroGPS, check:
- date and time of the control unit;
- coordinates of the real place;
- coordinates of the simulated place;
- UTC value;
- status of
Twilight:; - consistency of times displayed on the main page.
Lamp limit
The Lamp Limit menu allows you to set the maximum intensity that can be reached by the dimmable Lamp output. In this version the item is available when Usage Mode is set to Lamp Only.
The function can be used simply, with a fixed limit, or seasonally, automatically varying the maximum intensity during the program.
Seasonal light intensity
The seasonal intensity function allows you to automatically vary, over the course of the season, not only the duration of the photoperiod but also the maximum intensity of the lighting.
In nature, the change of seasons does not only affect the hours of light. In periods with shorter days the light intensity may also be lower than in periods with long days and greater lighting.
This function also allows you to reproduce this second aspect in a more natural way.
Operating principle
The user defines two values:
- minimum intensity, corresponding to the minimum photoperiod;
- maximum intensity, corresponding to the period of maximum photoperiod.
Example:
- minimum period:
40 %; - maximum period:
100 %.
SOL-7000 automatically calculates intermediate values.
Therefore, there is no sudden transition from 40 % to 100 %. The maximum intensity that the system can reach is progressively modified day after day, following the evolution of the seasonal program.
During the growing phase of the season the intensity may gradually increase, for example:
40 % -> 41 % -> 42 % -> ... -> 100 %
During the decreasing phase the reverse process occurs:
100 % -> 99 % -> 98 % -> ... -> 40 %
The values are only examples: the actual calculation is performed automatically by the programmer depending on the program used.
Effect on sunrise and sunset
The calculated value represents the maximum light intensity that the lamp can reach on that day.
If for a certain day the calculated value is 65 %, during dawn the brightness progressively increases up to 65 %, not up to 100 %.
During the full light period the expected level is maintained. As dusk begins, the brightness progressively decreases from that level until it turns off or turns on at night.
In this way, sunrise and sunset are also automatically adapted to the light intensity expected for the period of the season.
Menu path
Route:
MENU -> Operation Mode -> Lamp Only -> Lamp Limit
Screens displayed:
Lamp limitFixedorSeasonalFixed maxorSeason min/Season max
Fixed mode
With Fixed, SOL-7000 always uses the same maximum lamp value.
The display shows:
Fixed max
Use this mode when you want a constant maximum level throughout the program.
Seasonal Mode
With Seasonal, SOL-7000 uses a seasonal minimum and maximum value.
The display asks:
Season minSeason max
Once you set these two values, you do not need to manually change the brightness throughout the year. The programmer calculates the correct maximum intensity every day.
The variation occurs together with the variation of the photoperiod:
- reduced light period: lower light intensity;
- high light period: greater light intensity.As the program returns to the shorter period of the day, the intensity is also progressively reduced.
Use on SOL-7000
On the SOL-7000 the function acts on the dimmable Lamp output.
It is particularly suitable when the Only lamp configuration is used, in which one or more dimmable LED lamps provide dawn, daylight and dusk lighting.
In configurations that also use neon, the Lamp limit menu is not proposed: the programmer moves on to choosing the dimming profile. This choice avoids applying seasonal regulation to a system where the main daylight is managed by neon.
Commands
UPincreases the value;DOWNdecreases the value;ENTERconfirm;MENUexits the screen.
Why use it
Without this function, a seasonal program can progressively change the hours of light while always maintaining the same maximum intensity.
With seasonal light intensity, however, the programmer can simultaneously reproduce:
Light Duration + Light Intensity
The objective is to obtain a more gradual lighting management that is closer to the natural evolution of the photoperiod during the season.
Lamp profiles
SOL-7000 can use dedicated lamp profiles. Each profile is designed for a compatible dimmable lamp model.
Because dedicated profiles are needed
With the old incandescent lamps, the regulation was more predictable: different lamps had quite similar behavior and a control unit could control them with a generic curve.
Dimmable LED lamps are not all the same. Internal electronics, power supply, minimum threshold, response to regulation and shutdown behavior change. One lamp may rise smoothly, another may flicker, turn off too early or not follow the curve well, even if both are indicated on the packaging as dimmable.
This is why Season Generator is developing dedicated profiles for the recommended lamp models, so SOL-7000 can control them in a more progressive and stable way during dawn, dusk and night light.
The choice of the exact model of the lamp is therefore not a secondary detail: it is used to obtain a correct and repeatable adjustment.
Recommended lamps
To obtain the best result it is strongly recommended to purchase dimmable lamps directly from Season Generator.
In this way the control unit is used with lamps already selected and verified to work correctly with the available profiles.
Using lamps purchased elsewhere may require additional checks, because even lamps declared dimmable may behave differently during dawn, dusk and night light.
What to communicate in case of assistance
In case of problems, always indicate the exact model of the lamp installed and the chosen mode of use: lamp only, lamps + neon or lamps kept lit together with the neon.
Displayed profile choices
Path: MENU -> Dimming type.
The profile names identify the lamp calibration selected by the controller. In reference firmware B136, SG-LMP-0001 and SG-LMP-0002 are the two verified LED profiles, while Incandescent is for incandescent or compatible halogen lamps. Select the profile only after checking the exact lamp model.
Dimmer and neon
SOL-7000 was designed with two separate outputs for lighting control. To physically recognize the sockets and wiring, see also Electrical connections.
Lampoutput, dimmable, used to create sunrise and sunset;Neonoutput, ON/OFF, used to control the main lighting during the day when the system requires it.
Because there are two exits
In the past, sunrise and sunset were normally achieved with incandescent lamps.
These lamps allowed a gradual change in brightness, but consumed a lot compared to the light produced. For this reason it was not convenient to leave them on at maximum power all day.
The traditional solution was to use:
- a dimmable incandescent lamp for dawn and dusk;
- one or more neon lights for the main light during the day.
The programmer automatically managed the transition: at the end of dawn it turned on the neon and managed the lamp according to the chosen mode; before sunset prepared the reverse process, so the dimmable lamp could realize the gradual dimming of light.
Use with modern LED lamps
With dimmable LED lamps, maintaining two separate systems is not always necessary.
A dimmable LED lamp can realize dawn, daylight and dusk with much lower consumption than old incandescent lamps.
For this reason SOL-7000 allows you to choose the most suitable configuration for the installed system.
Menu path
Route:
MENU -> Usage Mode
Displayed screen:
Use mode
With UP and DOWN you choose the operating mode. With ENTER it is confirmed.
Available modes
| Display value | Meaning |
|---|---|
Lamp+Neon | traditional operation: sunrise and sunset on the lamp, daylight on the neon |
Only lamp | dawn, day and dusk achieved by the dimmable output alone |
Lamp(ON)+Neon | dimmable lamp and neon lit together during full light |
Lamp + Neon
This mode maintains the classic operation of Season Generator programmers.
The lamp is used for dawn and dusk, while the neon output manages the main lighting during the day.
It is a useful configuration in existing systems or when, in addition to dimmable lamps, you want to use neon or other specific light sources.
The transition between lamp and neon is managed automatically by the programmer.
LED Lamp only
This mode is designed for systems made exclusively with dimmable LED lamps.
In this case it is sufficient to use the lamp output. The same output manages:
Sunrise -> Daylight -> Sunset
Once dawn is over, the lamp remains lit at the expected brightness throughout the day. At the programmed time, sunset begins, with progressive reduction until it switches off or turns on at night.
It is not mandatory to install a second lighting system connected to the neon output.
However, on farms it is advisable to install at least two dimmable LED lamps, for example at both ends of the room. In this way the light is better distributed and, in the event of a lamp failure, another light source remains available.
In this configuration the Lamp limit menu is also available, which allows you to choose a fixed or seasonal maximum.
Lamp ON + Neon ON
This mode allows you to use both light sources simultaneously during the day.
The dimmable LED lamp runs normally at dawn. When it reaches maximum brightness, the programmer also turns on the neon output.
During the full light period the following remain on:
LED + Neon Lamp
This way you can get the maximum amount of available light during the day.
As sunset approaches, the programmer automatically manages the sequence necessary for the dimmable lamp to progressively reduce brightness.
This configuration is useful when dimmable LED lighting alone is not sufficient or when you also want to maintain and use the existing neon system.
Dimming type
Path:
MENU -> Dimming type
The screen identifies the profile used for the dimmable lamp. In reference firmware B136, the available choices are:
| Display value | Use |
|---|---|
SG-LMP-0001 | verified LED lamp profile |
SG-LMP-0002 | second verified LED lamp profile |
Incandescent | incandescent or compatible halogen lamp |
Choose only the profile matching the exact lamp installed. From this screen, press MENU to open Mains frequency.
In summary
The choice of mode depends on the type of system and the amount of light needed in the environment.
| Mode | Recommended use |
|---|---|
Lamp+Neon | sunrise and sunset on the lamp, daylight mainly via neon |
Only lamp | dawn, daylight and dusk entirely on the dimmable LED lamp |
Lamp(ON)+Neon | lamp and neon lit together to get more light during the day |
Mains frequency
What it is for
SOL-7000 controls the dimmable lamp in step with the electrical supply frequency. The Mains freq. setting lets you choose 50 Hz or 60 Hz, so sunrise, sunset and lamp level are calculated consistently with the supply available.
The setting does not change program times, photoperiod or selected tables. It affects only the way the controller drives the dimmable Lamp output during light ramps.
When to use 50 Hz
50 Hz is the default setting and is normally used in Italy and most European countries. After an update, a controller that did not previously have this setting is automatically configured for 50 Hz.
When to use 60 Hz
Choose 60 Hz only when the installation is actually supplied at 60 Hz. Do not choose the value from the lamp type or country of sale: it depends only on the supply feeding SOL-7000. When in doubt, ask a qualified electrician to check the installation.
Menu path
- Open
MENU -> Dimming type. - From the
Dimming typescreen, pressMENU. - The display shows
Mains freq.. - Use
UPorDOWNto select50 Hzor60 Hz. - Press
ENTERto save and return to the main screen.
Why the correct value matters
With the correct frequency, the controller places the dimming command at the appropriate point in the electrical cycle and keeps the lamp response more regular during sunrise, sunset, night light and night inspection. A value that does not match the supply can make dimming less regular. If the lamp flickers or does not follow the ramp after a change, restore the actual supply frequency and check the selected lamp profile.
Neon systems
Mains freq. applies only to the dimmable Lamp output. The Neon output continues to operate ON/OFF according to the selected usage mode.
Night light
The Night Light function allows you to maintain a low light intensity during the night phase.
Menu path
Route:
MENU -> Night Light
Displayed screen:
Night Light
Values
The display shows:
OFF, when the night light is deactivated;- a percentage, when active.
The maximum value that can be set is 50 %.
Commands
UPincreases the value;DOWNdecreases the value;ENTERsave;MENUmoves to the next function.
Recommended use
Use low values, sufficient to avoid complete darkness without turning the night into a daytime phase.
After the modification, observe the actual behavior of the lamp: some LED lamps may have a minimum threshold below which they do not remain stable.
Night inspection
The night inspection is used to enter the room when the light is off and make a short visit while disturbing the birds as little as possible.
By pressing the INSP. button the programmer starts a quick little dawn: the light gradually rises instead of turning on suddenly. During the inspection the dedicated light remains on, so it is clear that the normal program is temporarily suspended.
When the light is bright enough to see into the room, press INSP. again. In this way the level is blocked at the point reached, without causing the light to rise further.
If the button is not pressed a second time, the inspection continues to rise up to the level required by the configuration, and in systems with neon it can even lead to the neon turning on.
At the end of the visit, press INSP. again to exit the inspection. The light must go off: only then does SOL-7000 return to the main program. If the inspection remains active, the light can remain on and the normal day-night cycle is excluded.
Using the button
The INSP. button works in states:
| Pressure | Effect |
|---|---|
| first press | starts the inspection and gradually raises the light |
| second press | blocks the light at the level reached |
| final pressure | ends the inspection and returns the device to the main program |
Before leaving the environment, always check that the inspection light is off.
Menu path
Route:
MENU -> Inspection Duration
Screens displayed:
Inspection Duration ONInspection Duration OFF
Inspection duration ON
Set how many minutes the light goes up when the inspection is activated.
Inspection duration OFF
Set how many minutes the light goes down when exiting the inspection.
Commands
UPincreases the value;DOWNdecreases the value;ENTERconfirm;MENUmoves to the next function.
Remote button
The night inspection command can also be placed far from the control unit, for example near the room door.
Season Generator can provide an optional kit to remote the button. Alternatively, where the product diagram requires it, it is possible to use a clean button contact, installed in a component of the electrical system: by pressing that button you obtain the same effect as the INSP. button on the programmer.
The remote contact must only be a button, without carrying external voltage to the control unit.
Practical check
During testing:
- activate inspection during the night phase;
- check progressive ascent;
- Press
INSP.again when there is enough light to see; - check that the level remains blocked;
- press
INSP.again to exit; - check that the light is off;
- Check that the main program resumes.
Safety timeout
Night inspection must always be ended by pressing INSP and checking that the indicator is off. As an additional safeguard, reference firmware B136 ends an inspection left active by mistake after 200 minutes, using the configured exit ramp and returning to the main program. This automatic exit is a backup, not the normal way to end an inspection.
Energy saving
The Energy saving function allows you to reduce the consumption of the lighting system by exploiting, when available, natural light coming from outside.
The purpose is simple: if during some hours of the day the sunlight entering through the windows is sufficient to illuminate the room correctly, it is not necessary to keep the system lamps on.
The function does not change the daily sunrise and sunset schedule. The program remains the one chosen by the user; energy saving occurs only when the system can avoid using artificial light.
There are two main modes available:
- hourly energy saving, without sensor;
- energy saving with brightness sensor, if provided for by the installed version.
Menu path
Route:
MENU -> Savings -> Energy
Screens displayed:
Energy/SavingEnergy saving
The Energy saving screen may show:
DisabledNo sensorWith sensor
With UP and DOWN you change the mode. With ENTER it is confirmed.
Disabled
With Disabled, SOL-7000 only follows the selected light program.
Use this mode when you do not want any additional shutdown.
Savings by the hour
No sensor mode does not require any light sensor.
The user sets a period of the day during which he knows that the room normally receives a sufficient amount of natural light.
Example:
- the daily program foresees dawn starting at
06:30; - sunset is expected at
21:00; - the room is well lit by the windows between
11:00and14:00.
In this case you can set 11:00 -> 14:00 as the energy saving period.
During this interval SOL-7000 turns off the system lighting, avoiding consumption when artificial light is not necessary. Once the interval is over, the programmer automatically resumes the normal management foreseen by the daily program.
This solution is indicated when the natural light in the room is predictable and fairly constant.
Screens displayed:
Turn off lights/From time:Turn off lights/Up to hoursTurn-oFF Turn-ON/Gradual :
From hours
Set the shutdown start time.
Commands:
LEFTincreases hours;UPincrease minutes;ENTERconfirms.
Until hours
Set the end time for switching off.
Commands:
LEFTincreases hours;UPincreases minutes;ENTERconfirms.
Gradual
Values:
YESNO
With YES, switching off and on again occurs gradually. With NO, the transition is direct.
Savings with brightness sensor
The With sensor mode allows the programmer to automatically decide when the natural light present in the room is sufficient.
SOL-7000 can use:
- the integrated sensor, available on the SOL-7000;
- the external photocell, available as an optional Season Generator kit.
Screens displayed:
Sensor limitSensitivityTurn-oFF Turn-ON/Gradual :
Integrated sensor SOL-7000
When the built-in sensor is used, the position of the programmer is very important.
The control unit must be installed outside the room, or in a position where the sensor is not illuminated directly by the lights controlled by the system.The sensor must not directly read:
- the light of dawn;
- the sunset light;
- the main light or neon.
If the sensor is hit by the same lamps controlled by the programmer, a conflict is created: SOL-7000 is no longer able to correctly distinguish the natural light coming from the outside from the artificial light of the system.
The position of the control unit must therefore allow the sensor to evaluate the natural brightness available in the room.
External photocell
Alternatively, it is possible to use the external photocell, available as an optional kit.
The energy saving photocell is not equivalent to other sensors or buttons used for different functions and must not be self-built by the user.
The kit must be purchased from Season Generator, connected according to the instructions provided and calibrated after installation.
Threshold calibration
Calibration allows you to indicate to the programmer which level of natural light should be considered sufficient.
Recommended procedure:
- wait for a time of day when the natural light coming from the windows illuminates the room satisfactorily;
- access the threshold setting function;
- read the level detected by the sensor;
- when the present brightness corresponds to the desired condition, confirm with
OK; - save the value as a reference threshold;
- choose whether the shutdown should be immediate or gradual.
Sensitivity
Sensitivity sets the margin used to avoid continuous switching on and off when natural light is close to the threshold.
Automatic operation
After calibration, operation is automatic.
SOL-7000 compares the brightness detected by the sensor with the set threshold. When natural light reaches or exceeds the threshold, the programmer considers the room sufficiently illuminated from the outside and intervenes on the artificial lighting according to the chosen mode.
When natural light is no longer sufficient, the system returns to the normal lighting management provided by the program.
In this way the lamps remain on only when they are really necessary, reducing consumption without changing the sunrise and sunset programme.
Time and date
SOL-7000 uses an internal clock to calculate schedules, times and daily progressions.
Why it matters
Correct date and time are needed for:
- dawn;
- sunset;
- automatic programs;
- seasonal progressions;
- AstroGPS;
- Personal2.
Menu path
Route:
MENU -> Edit -> Time and Date
Screens displayed:
Modify/Time and DateTime/Date
Setting
The Time/Date screen allows you to set the hour, minute, day, month and year.
Commands:
LEFTincreases hours;UPincreases minutes;DOWNincreases day;RIGHTincreases the month;MENUincreases the year;ENTERconfirms.
Set the date and time when you first turn it on and check them again after long periods without power.
If the device is used for seasonal programs or to gradually shift the photoperiod, the clock must be kept correct.
Periodic checks
Periodically check:
- current time;
- date;
- selected program;
- consistency between the displayed time and the desired light cycle.
Assistance
If the time shifts noticeably or the program does not follow the set times, contact assistance indicating the model, date of purchase and observed behavior.
Troubleshooting
This page contains quick checks before contacting assistance.
The device does not turn on
Check:
- power supply present;
- upstream protections;
- wiring;
- fuses if provided;
- absence of short circuit;
- correct hardware revision.
Do not open the device.
The display turns on but the lamp does not
Check:
- selected program;
- time and date;
- lamp profile;
- output configuration;
- compatible lamp;
- connections and terminals.
The lamp flickers
Possible causes:
- non-dimmable lamp;
- incorrect lamp profile;
- stable minimum too low;
- unsuitable wiring;
- disturbances or incompatible load.
Test with a lamp supplied or verified by Season Generator.
The neon does not activate
Check:
Dimmable + neonmode;- product version;
- neon wiring;
- lamp profile;
- end of sunset ramp;
- any active protections.
If the neon does not activate at the expected point, check connections and configuration of the output mode.
Temperature protection intervenes
Check:
- ventilation;
- room temperature;
- load connected;
- control unit position;
- dissipation;
- load connected.
Current protection intervenes
Check:
- lamp power;
- short or false contact;
- incompatible load;
- absorption during dawn/dusk.
Turn off the control unit, check the load and turn it back on only after having removed the probable cause.
The time moves
Check:
- time and date set;
- any long periods without power;
- consistency between current date and selected program.
Information to prepare
For assistance prepare:
- product photo;
- wiring photo;
- lamp model;
- lamp profile;
- selected program;
- description of the problem;
- any photos or videos of the behavior.
Technical specifications
This page contains general product data. The definitive commercial electrical values must be checked with the technical data sheet and product file.
Identification
| Voice | Value |
|---|---|
| Product | SOL-7000 |
| Brand | Season Generator |
| Type | professional photoperiod programmer |
| Function | dawn-dusk and photoperiod management |
| Releases | lamp, neon and dimming according to configuration |
| Interface | display and front buttons |
| Settings memory | permanent |
Main functions
| Function | Description |
|---|---|
| Programs | Personal, Personale2, AstroGPS, Manual and preloaded tables |
| Ramps | gradual sunrise and sunset |
| Lamps | profiles for compatible dimmable lamps |
| Neon | lamps + neon mode or lamps kept together with neon |
| Night light | percentage adjustment, if enabled |
| Energy saving | time band or light sensor, according to version |
| Languages | multilingual menu |
Product data
For definitive electrical and mechanical data, refer to the product label and the technical data sheet supplied with the control unit.
Always check that voltage, maximum load, installation environment and connections are compatible with the version actually installed.
Compliance and guarantee
Intended use
SOL-7000 is intended for professional photoperiod management using compatible lamps and systems.
Any use other than that intended, or inconsistent with the technical instructions, is considered improper.
Compliance
Product conformity is assessed on the actual configuration supplied and accessories used.
For correct installation always consider:
- hardware revision;
- product version;
- accessories;
- wiring;
- diet;
- installation environment;
- technical documentation supplied with the product.
WEEE
The product must not be disposed of with household waste.
At the end of its life it must be returned according to local rules to authorized centers or services for electrical and electronic equipment.
Warranty
The warranty covers defects according to the applicable legal terms and commercial conditions.
The warranty does not cover damage caused by:
- incorrect installation;
- improper use;
- incompatible loads;
- exceeding the declared limits;
- unauthorized modifications;
- opening the device;
- unauthorized software modifications;
- external events or overvoltages;
- failure to comply with the instructions.
Assistance
Before requesting assistance, prepare:
- product model;
- order number or purchase reference;
- installation photo;
- lamp profile;
- description of the problem;
- photos or videos of the problem if available.
Contacts
| Voice | Given |
|---|---|
info@seasongenerator.it | |
| Web | www.seasongenerator.it |